Clients are an essential part of wireless networks. They require a specific section in CCNA Wireless because not all clients are the same. Wireless clients are differentiated by three types of characteristics:
- Wi-Fi client adapter: Most devices produced today come with built-in wireless adapters. Older devices can be outfitted with an external wireless networking card. Different cards might have different physical characteristics and capabilities.
- Wireless client software: Client software, such as the Intel ProSet, AirPort Extreme for MAC, Windows AutoConfig Service, Apple iOS, and Google Android, can be configured for the client to associate with an AP. Different software applications can have different feature sets and different supports for the underlying physical card capabilities.
- Client security settings: There are several possible security configurations to achieve wireless security. Some clients support only some security types, thus limiting the type of wireless network you can join.
Most clients enable you to associate to a detected network (broadcasted SSID) or configure a specific profile. In all cases, you must configure the network name (SSID), the operating mode (ad-hoc or infrastructure), and some security settings (that will be different depending on whether the SSID uses Pre-Shared Key Security or Enterprise [EAP/802.1x] security). The way each of these three items is configured (sequence, menu names, configuration possibilities) varies from one client to the next.
Intel ProSet
Because Intel is a major wireless chipset vendor, it is common to see wireless clients use the Intel ProSet utility to configure an Intel wireless card. The client features are integrated to Windows with Windows 7, thus adding new functionalities to the Windows wireless utility instead of offering a different program interface. For example, Windows natively does not support EAP-FAST or LEAP (Mac Export Extreme natively supports these security mechanisms). Using Intel ProSet adds support for these mechanisms on a Windows machine. In older Windows versions (Vista and older), Intel ProSet can be installed to replace the Windows utility and offer a specific interface to configure the Intel wireless card.
Once installed, the utility appears as an icon representing a wave at the right of the taskbar. Right-clicking that icon offers the option to disable the wireless card, connect to an already configured wireless network profile, or open the Intel ProSet utility.
Opening the utility displays the list of detected networks. You can connect to a network by double-clicking the network name in the list (or clicking the name then clicking Connect) and answering the questions relevant to the SSID security credentials when applicable.
You can also click Profiles to manage existing profiles (modify or delete) or create new profiles. When creating a new profile, you first must enter the SSID name, the operating mode (ad-hoc or infrastructure), and then the security type (personal, using open or preshared key authentication, or enterprise, using 802.1X/EAP authentication). You then configure the security details based on the security type you chose. Figure 3-1 shows the Intel ProSet main options.
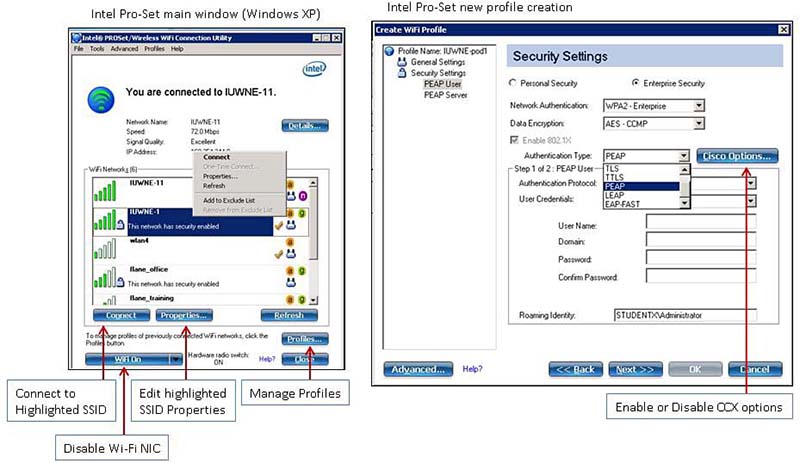
Figure 3-1 Intel ProSet
Intel is part of the CCX program, and the Intel ProSet utility offers the possibility to enable or disable CCX functions. The Intel ProSet utility also offers a diagnostic function. When connection to a wireless network fails, you can click the Troubleshoot button from the utility main window to access the tool. For a working connection, you can also navigate to Advanced > Advanced Statistics to see a detailed output for the current WLAN connection.
Mac AirPort Extreme
AirPort (for 802.11b) and AirPort Extreme (for 802.11b/g/n or 802.11a/b/g/n) are WLAN configuration utilities from Apple. The utility allows the creation of network profiles, association to detected networks, and advanced configuration and troubleshooting. The wireless card can be disabled or enabled from the utility main window. The utility automatically attempts to join detected networks (trying the preferred profiles first) and offers to connect to the available networks if no preferred SSID is in range. On the left of the screen, the available network connections (wired and wireless) are displayed, and the connection status of the WLAN adapter can be displayed, along with the signal level.
You can connect to a detected network by clicking the network name, and then clicking the join button and answering the questions relevant to the SSID security credentials when applicable. You also can create a new profile by clicking the + button instead of clicking a detected network name. You can then choose the Create Network option to create a new ad-hoc network, or Join Other Network to create a new infrastructure profile. After you enter the SSID name, you can choose the security type, and then enter the parameters relevant to the security type you chose.
From the AirPort main menu, click Advanced to display advanced parameters for the network connections. A new window appears, with seven tabs (AirPort, TCP/IP, DNS, WINS, AppleTalk, 802.1X, and Proxies). Among these tabs, the AirPort tab lists all the configured profiles. Clicking on one of them enables you to edit its configuration parameters. It is also possible to change the connection order and select other general parameters. The 802.1X tab enables you to select each configured wireless profiles and edit its 802.1X/EAP security settings when applicable.
When the wireless card is enabled, an icon is present in the desktop menu bar. Click the icon to see basic information about the connection (SSID name and connection options), or press the Option key and click the icon to see detailed information about the connection (SSID name, capabilities [802.11a/b/g or n], BSSID MAC address, channel, RSSI, security, and data rate/MCS). Figure 3-2 shows Mac AirPort Extreme.
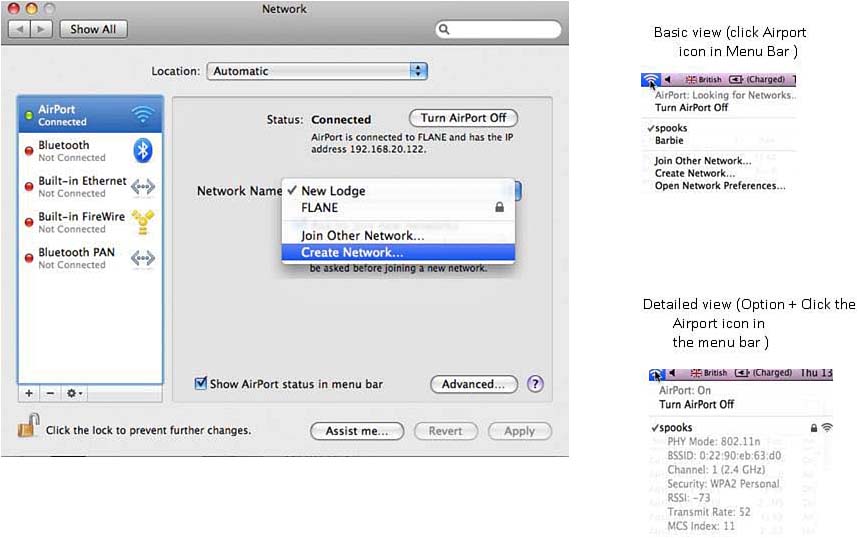
Figure 3-2 Mac AirPort Extreme
The AirPort main window also displays an Assist Me button, which launches a network diagnostic utility, useful to conduct a step-by-step diagnostic of the wireless connection to determine the step of the connection at which the process is failing.
Windows LAN AutoConfig Service
WLAN AutoConfig service (WAS) is a built-in tool in Windows Vista and Windows 7 used to detect and connect to a wireless network. When the computer boots, if no WLAN is preconfigured, the WLAN AutoConfig sends null (empty SSID name to discover all SSIDs) and unicast (with each SSID names configured in the stored profiles) probe requests on all supported channels in turn. The utility then reports the detected networks. If a detected network matches a profile in the preferred list, the AutoConfig tries to join the WLAN. If there are no successful connections, the WAS attempts to connect to the preferred networks that do not appear in the list of available networks in the preferred networks priority order. If there are no successful connections but there is an ad-hoc network in the list of preferred networks that are available, the WAS tries to connect to it. If no connection is possible to any network and there is an ad-hoc network present in the preferred networks list, the WAS configures the wireless network adapter to act as the first node in this ad-hoc network. If there are no ad-hoc networks in the list of preferred networks, the utility creates a random network name and places the wireless network adapter in infrastructure mode. A message stating that One or More Wireless Networks Are Available is displayed in the notification area. After 60 seconds, the process restarts from the beginning.
You can connect to a detected network by clicking the wireless connection icon in the status bar, clicking an SSID name (the signal strength of the associated AP is represented by green bars, five bars representing the best signal; an exclamation mark inside a yellow shield is displayed if the SSID has no security [Open authentication, no encryption]), clicking Connect and completing the security parameters when applicable.
You also can manage profiles by clicking the wireless connection icon in the status bar, choosing Open Network and Sharing Center, and then Manage Wireless Networks. From there, you can delete, modify, reorder or create profiles. When creating profiles, click Add, choose Create an ad-hoc network or Manually create a network profile (infrastructure). Enter the SSID name and the security type. Then complete the security configuration parameters. Figure 3-3 shows Windows WAS.
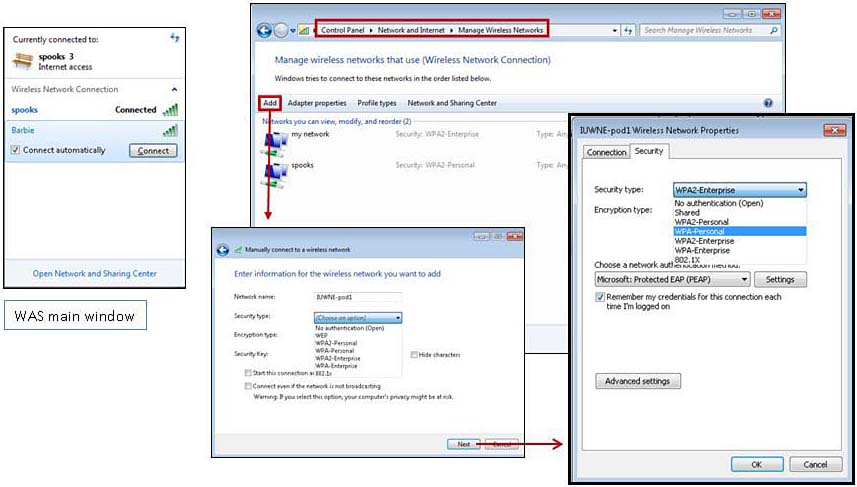
Figure 3-3 Windows Wireless LAN AutoConfig Service
iPhone and Android
New portable devices commonly embark Wi-Fi functions and enable you to connect to a detected network or configure profiles. These devices often support 802.11b/g/n and allow connections to networks with personal (preshared key) and enterprise (EAP/802.1X) types of security parameters.
Cisco AnyConnect Mobility Client
The Cisco AnyConnect Secure Mobility Client is a multifunctional and modular security client. It was built to enable you to use the same interface across various hardware and software platforms (operating systems) to manage and secure your connections to the network. It contains several modules:
- VPN Module
- Diagnostic Reporting Tool (DART, to analyze and troubleshoot connections)
- Network Access Module (provided as part of the Network Access Manager to manage user and device identity over wired and wireless deployments)
- Posture Module (to identify the operating system, antivirus, anti-spyware, and firewall installed on the host)
- Telemetry (used with the Cisco IronPort Web Security Appliance to identify the source of malwares)
- Web Security Module (cloud-based real-time web protection and policy enforcement)
You can just install the modules you need, then add or remove modules as the security needs change.
The main components used in IUWNE are the Cisco AnyConnect Mobility Client itself, associated with the Network Access Module (NAM) used to manage existing profiles. AnyConnect Network Access Manager is licensed without charge for use with Cisco wireless access points, wireless LAN controllers, switches, and RADIUS servers, but a current SmartNet contract is required on the related Cisco equipment.
The Cisco AnyConnect client and the NAM module can be deployed by asking users to open a web browser session to an ASA running ASDM GUI version 6.4(0)104 or later and download the required modules, or by installing the modules manually on each client. Note that the AnyConnect VPN installer must be installed first, before AnyConnect client and NAM, even if you do not need VPN. Without the VPN component, the other modules cannot work properly.
Once installed, the AnyConnect client displays an icon in the status bar. Click the icon to open the utility and connect to one of the detected wireless networks. You also can click Advanced to open the NAM front end. You can then manage profiles (create, delete, reorder). The network administrator can restrict the types of networks that the end user can manipulate on the NAM. For example, AnyConnect can be set to allow the user to manipulate only networks with PSK or with no security. In this configuration, the administrator (with the ASA or the NAM Profile Editor utility) will be required to add, delete, or modify any SSID profile with another type of security.
When adding a new profile, the process follows the typical sequence: First, add the SSID name, and then choose the security type before adding the details relevant to the security mechanism you selected. Figure 3-4 shows the Cisco AnyConnect interface.
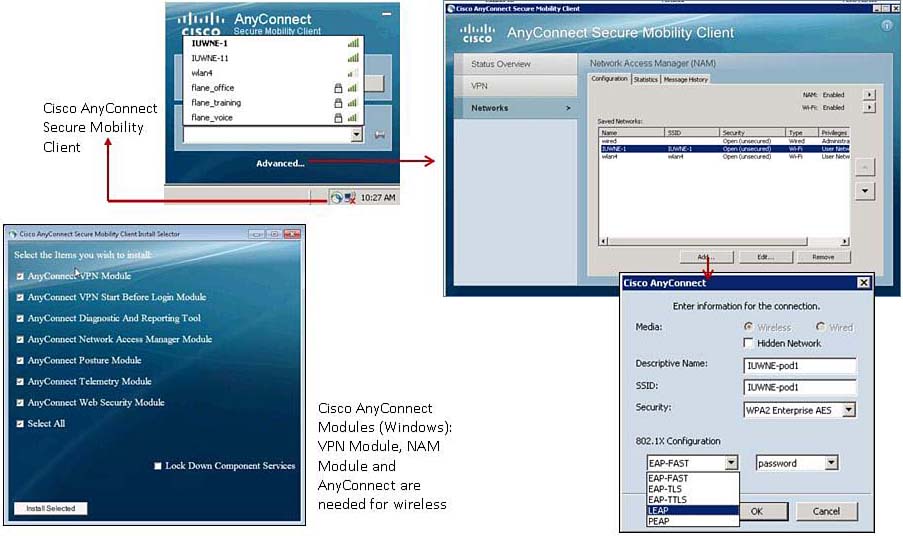
Figure 3-4 Cisco AnyConnect
AnyConnect offers the DART module that can be used to analyze and troubleshoot connections. The information collected by DART can be examined locally or exported and sent to a network support desk for analysis.
Cisco Compatible Extensions (CCX)
CCX Principles
Cisco created the Cisco Compatible Extensions program to integrate new features in wireless devices faster than the 802.11 standard development cycle would allow. CCX are features integrated to the wireless client’s driver software and Cisco access points. Features are developed as part of a CCX program release and distributed to partners. More than 90% of silicon suppliers and hardware vendors of WLAN adapters and client devices are part of the CCX program today (from chip and PC manufacturers such as Intel, Atheros, Broadcom, Conexant, Marvell, Ralink, and Texas Instruments, to wireless manufacturers such as Acer, Ascom, Dell, D-Link, Fujitsu, HP, Lenovo, Linksys, Netgear, Nokia, Psion, Sony, Toshiba, Symbol, Motorola, and many others).
Cisco has a CCX program for Wi-Fi and another CCX program for Wi-Fi radio frequency identifiers (RFID), allowing those tags to transmit specific telemetry (temperature, pressure, humidity, distance, motion, and fuel levels), emergency (panic button), and battery charge information.
CCX for Wi-Fi devices includes up to 70 features. For example, Cisco Centralized Key Management (CCKM) allows client credentials to be passed from one AP to the next as the client roams, and allows roaming clients to communicate with the infrastructure about these cached credentials, thus suppressing the need for the roaming client to reauthenticate through each AP and making the roaming process faster and more efficient.
The AP can also communicate with the wireless clients to exchange information and instructions. For example, an AP can ask a client to increase its power level (when the client signal is weak at the AP level, avoiding connection drops) or reduce its power level (to save battery when the client signal is strong). This feature is called AP-specified max power.
The AP can also help the client roam with the enhanced roaming family of features. The AP asks the client to stop scanning for alternative APs while the client is the heart of the cell (thus saving client battery), then instructs the client to start scanning when the client signal shows that the client approaches the edge of the cell (thus scanning only when needed). The AP can also ask the client to scan and report the list of detected APs (with SSIDs, channels, power levels, and so on). This list can be transmitted to other clients at the edge of the cell to facilitate neighboring AP discovery and roaming, as the client knows the list of channels and SSIDs to query and does not waste time and battery life scanning all possible channels for all possible SSIDs. Figure 3-5 shows some examples of CCX features.
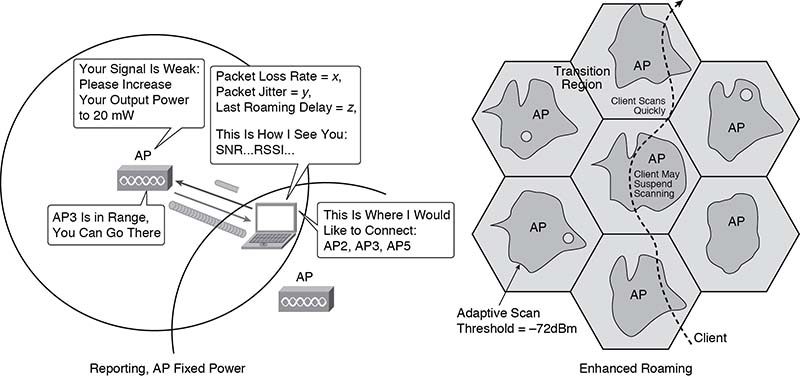
Figure 3-5 CCX Features Examples
The AP can also sign its management frames, thus enabling Management Frame Protection (MFP). This enables the other APs to report any unsigned management frame (the possible sign of a rogue AP trying to impersonate a valid AP). Client participation is not needed for this version of MFP, called Infrastructure MFP. Clients supporting CCXv5 can also use this signature mechanism, with a second generation of MFP (Client MFP), to ignore any unsigned or improperly signed management frame, thus removing the possibility for a deauthentication attack to the network. Figure 3-6 shows how MFP works.
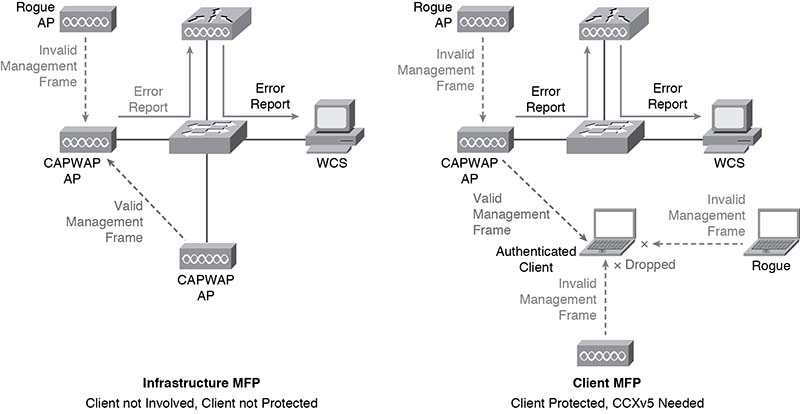
Figure 3-6 Management Frame Protection
CCX Versions and Features
Historically, there have been five versions of the Cisco Compatible Extension (CCX) specification labeled Version 1(V1) to Version 5(V5). Each version built upon its predecessors. For example, CCXv5 added MFP, real-time reporting between client and AP, a diagnostic channel to help troubleshooting clients and optional location services, and improved several CCXv4 features. Each version contains a list of features. In summer 2011, Cisco separated the CCX features into four subfamilies to help vendors integrate only those features that are needed for their specific wireless clients (called application-specific devices, which are devices built for a specific function [for example, barcode scanners or VoWLAN phones] and therefore do not need all the CCX features that a data laptop would need). This is called the CCX Lite program, with four components:
- Foundation (for standard CCX features for connectivity and security)
- CCX Voice (for VoWLAN-specific features, such as QoS enhancements)
- Location
- Management (for connection reporting and troubleshooting)
Foundation is always needed to be certified CCX Lite, but the other subfamilies are optional.
The Cisco wireless infrastructure supports all CCX features on controller code release 7.0.116 and autonomous AP code release 12.4.25. No other wireless infrastructure vendor supports CCX (which means that you need a Cisco wireless infrastructure to support CCX). The CCX version supported on the client depends on the vendor and card. Not all vendors integrate the latest CCX version for all cards. This means that your wireless clients will benefit from the CCX features matching the CCX version they support (the client CCX version can be seen in the client detailed datasheet and on the client detailed monitor page on the controller through which the client associates).
As a CCNA Wireless, you do not need to know the details of all CCX features and version but are definitely expected to know the components of the CCX Lite program. Also, because support for fast roaming (with CCKM) depends on the security mechanism in use, you must know which version of CCX allows for which security mechanism support, as shown in Table 3-1.
Table 3-1 CCX Version and Security Support
|
|
CCX v1 |
CCX v2 |
CCX v3 |
CCX v4 |
CCX v5 |
|---|---|---|---|---|---|
|
IEEE 802.1X |
X |
X |
X |
X |
X |
|
LEAP |
X |
X |
X |
X |
X |
|
PEAP with EAP-GTC (PEAP-GTC) |
|
X |
X |
X |
X |
|
EAP-FAST |
|
|
X |
X |
X |
|
PEAP with EAP-MSCHAPv2 (PEAP-MSCHAP) |
|
|
|
X |
X |
|
EAP-TLS |
|
|
|
X |
X |
|
Wi-Fi Protected Access (WPA): 802.1X + WPA TKIP |
|
X |
X |
X |
X |
|
With LEAP |
|
X |
X |
X |
X |
|
With PEAP-GTC |
|
X |
X |
X |
X |
|
With EAP-FAST |
|
|
X |
X |
X |
|
With PEAP-MSCHAP |
|
|
|
X |
X |
|
With EAP-TLS |
|
|
|
X |
X |
|
IEEE 802.11i – WPA2: 802.1X + AES |
|
|
X |
X |
X |
|
With LEAP |
|
|
X |
X |
X |
|
With PEAP-GTC |
|
|
X |
X |
X |
|
With EAP-FAST |
|
|
X |
X |
X |
|
With PEAP-MSCHAP |
|
|
|
X |
X |
|
With EAP-TLS |
|
|
|
X |
X |
|
Management Frame Protection |
|
|
|
|
X |